Friday, June 1, 2012

Sleeping pad overview

One of the parents in my scouting unit asked me which sleeping pad I used.  Well, the answer isn't as simple as just one pad.  Here is the reponse I provided:

·         The standard blue foam (modeled after Army sleeping pads):  Rugged, tough, indestructible, absolutely dummy proof and the least comfortable of the list.  However, they keep sharp things out of your back and at least let you sleep.  These are good for boys or if you are in a location you are concerned about durability.  You can get these much cheaper at Wal-Mart.  http://www.rei.com/product/374053/standard-blue-foam-pad-regular

·         Thermarest ridge rest.  Tries to make the blue sleep pad more comfortable by softening the foam and adding small ridges.  You’ll take a slight hit on durability but get a slightly more comfortable sleeping pad.  Still have a dummy-proof sleeping pad that any one can setup and use.  http://www.rei.com/product/810386/therm-a-rest-ridgerest-solite-sleeping-pad

·         Thermarest Basecamp.  This one is my high dollar pad- and the most comfortable one I’ve ever slept on for a sleeping pad.  It is a self-inflating pad and reasonably rugged.  The existence of a patch kit tells me they can fail, but mine never has.  I can tell you that I let my wife sleep on this once and she now prefers sleeping on this instead of the Army cot.  At 4lbs, it is also the heaviest and largest pad in the bunch.  I’m generally unlikely to carry it on backpacking trips.  http://www.rei.com/product/797485/therm-a-rest-basecamp-sleeping-pad   [Note – there are several other brands that follow this same self-inflating model with similar specs for less money.  I just have a good track record with Thermarest and like their products. 

·         Thermarest has one level above the basecamp called the luxury pad.  I don’t have personal experience with it but it gets great reviews if you’re willing to drop the dough.  http://www.rei.com/product/797494/therm-a-rest-luxury-map-sleeping-pad 

·         My most recent acquisition to my sleeping pad line is the Thermarest Neoair Trekker.  It isn’t quite as rugged as the basecamp pad and I have to blow this one up (as opposed to self-inflating) and it is also more expensive that my Basecamp pad and just slightly less comfortable.  So why did I get it and decide to keep it?  It’s only 16 ozs and rolls up incredibly small.  In other words, this is my backpacking sleeping pad.  http://www.rei.com/product/810375/therm-a-rest-neoair-trekker-sleeping-pad
  

Note: contrary to what it may appear, I'm not getting any kickback to endorse REI or Thermarest.  REI was a convenient place to list all the thermarest products, and as i explained, I have a good track record with Thermarest and will probably stick with them until given a motive to do otherwise.

Thursday, May 10, 2012

Eddie Bauer Dome Tent - Round 2

So in my previous review, I lamented about the poor design of the Eddie Bauer 10x10 5 man dome tent.  My most specific complaint was a design that guaranteed the tent would leak.  In addition- and I didn't mention this in my previous review- but the only people that could fit this tent in the carrying bag are the people the pack this tent off the assembly line.  As you can tell... I'm really unhappy with Wenzel/Eddie Bauer.  However, today's blog entry is not to bash them further, but to describe what I did to work around their ineptness.

First for the obvious and quick fix... I purchased a $5 stuff sack at Wal-mart for packing the tent.  Not nearly as stylish as the Eddie Bauer case, but I don't bust a neck vein trying to put the tent back into it.  I don't expect anyone to find this particularly clever either- I'm just sharing because I'm letting you know that if you get this tent you'll probably need to do the same.

To fix the leaking tent required a bit more work.  I purchased several yards of black 210D waterproof nylon.  I cut the material into a 5ftx5ft square and sewed a loop on one corner and grommets on two of the corners.  I was able to run the ridge pole through the loop and attach bungee cords through the grommets on the corners so the finished product looked like this (repeated on over both doors):

I had hoped it would look more like it came from the factory- but alas, I wasn't so lucky.  However, I'll accept the looks of this in return for staying dry.  It's also easy enough to put on or remove, I can leave it off most of the time except when I am expecting rain.

The proof is in the waterproofing though... all this is for naught if the tent still leaks.  Fortunately, there is a 70% chance of rain over the next 2 days so I'm going to leave the tent setup and see how it fairs.  With any luck, it should stay bone dry.  I'll update this blog after the rain.

U PDATE:  So the flaps made a large difference.  Although some water still managed to make it in the tent, it is probably because I have yet to waterproof the exposed black areas of the tent.  Water accumulation in the tent was negligible... probably about 2~3 tablespoons if I were to guess.

Wednesday, May 9, 2012

DESTINATION REVIEW: Martin Creek Lake State Park

I've reviewed this destination at one of my other sites, but I wanted to offer a high level review of this state park.  Martin Creek Lake State Park is a Texas State Park south of Longview, Texas.  (I believe Tatum is the closest town.)

The unique draw to this state park was an island accessible via a footbridge where primitive camping is allowed.  You will not find a map anywhere that shows the exact locations of the primitive campsites.  Even when I asked the ranger, he said the sites are dynamic and people move the steel fire rings around the island.  Consequently, you rather find yourself wandering the trails until you find a spot you like.  To help out though, I've produced a map that shows the approximate locations of several of the primitive sites shown as blue stars.  However, I would strongly recommend the site we stayed at marked with the red star.  It was definitely one of the largest sites on the island.  We setup 6 tents for our Webelos and could have fit another 6 rather easily.  By comparison, some of the primitive sites we walked past would have only fit 2~3 tents.  Another benefit of the site I am suggesting is that it is on the back side of the island so you don't have people walking through your site on the way to their own.


As you look at the map above, you'll notice there is a large field/meadow in the middle of the island.  Ironically, the meadow proved to be a lousy place to try and setup camp.  Even in mid-April, we found the grass in the meadow so high it simply wasn't practical to try and setup camp.  Furthermore, the absence of fire rings that can be found in some of the wooded campsites make the meadow a poor place to try and setup camp.

As a final tip/note about the developed campsites (as opposed to the primitive sites), there is a WIDE variation in the different sites even though they are all categorized the same.  For example, there are multiple lakefront sites, but several had a marshy waterfront that made fishing access impractical.  There were others that you could pull a canoe on.  As another example, some sites were large enough and level enough for 3~4 tents.  Other sites however, were significantly sloped enough that the only place to setup a tent was on the tent pad.  As yet a third example of the variations, certain sites have a pre-built shelter/covered picnic table but other sites do not (see pictures).


Sites are first come, first serve so arrive early.  To get a preview of some of the sites, look at the pictures on my review at ScoutDestinations.com

Friday, May 4, 2012

Cabela's Heavy Duty Army Cot


So first let's look at what Cabela's says:
  • Built to exacting specifications demanded by the military
  • Heavy-duty polyester oxford
  • Heavy-duty aluminum frame with steel tube inserts
  • Will support up to 500 lbs.
  • Easy to set up and take down
  • Folds into a compact package
We built this cot to exacting quality standards demanded by military specifications. The sleeping area is 77''L x 28''W and constructed of heavy-duty polyester oxford for years of use. The frame is heavy-duty aluminum with added strength supplied by steel tube inserts that will support up to 500 lbs. The cot is easy to set up and take down, and it folds into a compact package secured by attached webbing straps with ladder locks. Imported.
Dimensions: 77''L x 28''W x 18''H.
Carry weight: 18 lbs.
Weight capacity: 500 lbs.


Now for my review... I actually purchased two of these cots so my experience isn't limited to a single defective unit.  (See I'm already being negative again.)  I suppose it's because I demand quality from my camping gear and I am sorely disappointed when it doesn't deliver.  As I review more items, I'll disclose some that truely are stellar products that I strongly endorse, but the cot today won't make that cut.

Well, the cot certainly handles weight well enough.  I didn't try to verify the 500lb limit, but it handled my 6'1" frame @ 270lb frame with relative ease.  It was stable in most directions and did not wobble or otherwise unduly sag.  I never felt like my heft was concerning to the cot.  However, the term "heavy duty" should be constrained to the weight bearing capacity of the cot and not the build quality.  I had problems with one of the straps that actually came off the rivet the first time I tried to use it.  Also, most of the plastic plugs did not want to stay in the holes.  I even lost 2 of them transporting the cots back and forth and campouts and never did find the plugs again.

That said, it was VERY squeaky from the polyester oxford against the aluminum.  I never did find a way to quiet it down, so any time I rolled over or repositioned myself, it was VERY creaky. 

I take significant issue with the claim of easy setup and take down.  The practice is much easier to describe than to perform- much in the same way as rock climbing.  "Just pull yourself up using the natural cracks and ledges and don't fall down."  Reality shows the physical strength to do this is much greater than the simple directions might suggest.  So it is with the Cabela's Heavy Duty cot.  While it is probably true of all Army style cots), the fact remains it was VERY difficult to stretch the material tight.  There was *NO WAY* that my 10-year old son could do it... nor even my wife.  In fact, with a small amount of embarrassment I admit that it was difficult for me to set it up and pull it tight enough to get the end pieces over the pins. 

One day after unsuccessfully trying for almost 10 minutes, I developed a technique that made it MUCH easier!  I discovered I could put the end pieces on rotated 90 degrees from where the holes needed to be.  Then by using a tent stake, dowel rod or large screwdriver I was able to excert a fair amount or torque and twist the bar into place.  This still proved too difficult for my wife and son, but was a technique I used repeatedly with pretty good reliability and minimal strain (that's compared to what it was previously).

I discovered I could also remove the plastic plugs that so easily fell out and it was MUCH easier to slip the end pieces in place as well.  This works as a solution as long as you're not planning to use the uprights to hold a mosquito bar in place, but the plastic pieces are necessary to keep the bar from needlessly rotating when the mosquito bar is up.

Finally, even after getting the cot up, it was still uncomfortable.  :-(  Ok, let me be fair, it's an Army cot, not a serta.  I used my thermarest base camp pad and achieved a decent level of comfort, but that is a credit to the Thermarest pad, not the cot.  I get near similar comfort with the Thermarest pad on the ground.  Consequently, I decided to sell the cots.

All-in-all, they just weren't worth keeping.  I wouldn't discourage you from buying them if you want an Army cot but it's not going to make the grade for Anthony's encorsement.

Sunday, October 9, 2011

Eddie Bauer 10x10 Dome Garbage- ahem- I mean tent

So I was unhappy with the Coleman Family tent because it leaked during rains.  The primary failure is an inadequate rain fly and poor engineering of the tent, but I'll do a full review of that tent another day.  Today's review is about the 10x10 Eddie Bauer 5 man Dome Tent (Model EB30004 made by Wenzel).

My goal was pretty simple, to find a tent large enough I could setup 2 army-style cots and still have room for 2 kids and our gear.  Oh- and I wanted two doors and one that was waterproof- the primary reason I didn't like the Coleman tent.

I found the 10x10 Eddie Bauer tent on eBay for $75 plus $35/S/H so I knew I was getting a cheap tent.  Although the size was on the small side of what I needed for a family tent, I was drawn to what appeared to be the good rain fly coverage (See this pic)

and screen sides (desirable for camping in Texas).

So I was optimistic and eager to review the tent.  Well, it arrived yesterday and there was a chance of rain so I hurried to set it up in advance of the storms because I wanted to see if the rainfly coverage would keep the tent dry like I expected.  My results led me to provide some of my own picture of the product:


So why would I be so judgmental about a product I just received and haven't even used for one night?  It all amounts to the same problem but I'll try to express it in several ways:
  • Poor engineering
  • Lack of field testing
  • Absence of common sense
  • Inattention to detail
  • Ultimately, a tent design that GUARANTEES the tent will leak.
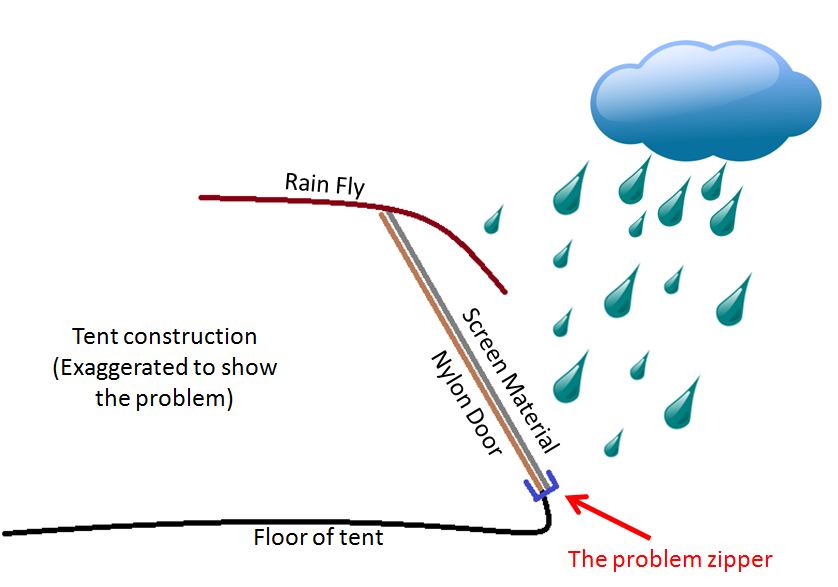
At the risk of revealing the obvious prematurely, a picture will help me clearly explain the problem:


So here is what happens, during a rain, even the slightest wind will blow the rain on the portion of the door that is NOT under the rain fly.  The rain today wasn't even heavy- somewhere between a drizzle and a sprinkle. 
1) Anyway, the rain fell on the screen mesh which provided virtually zero stoppage (it's not supposed to, it's screen!)  and stopped at the nylon tent material of the door. 
2) At this point, it ran down exterior of the door until it hit the cloth zippers that hold the exterior screen door and the nylon tent door (yes, there are two seperate zippers). 
3) Water that drains down, accumulates between the exterior screen door and the interior nylon door- right where the cloth zipper lies.
4) At this point, there is nowhere for the water to go.  It just waits until it saturates the cloth zipper material (which doesn't take long) and starts to drip into the interior of the tent.
5) Even if the zipper material were entirely waterproofed, I suspect water would still find its way around the teeth of the zipper.

So my conclusion, with the current design of this tent, it is IMPOSSIBLE for the tent to remain dry in even the slightest of rain.  Although I purchased the tent new off eBay, I don't suspect I am going to get any solution from Eddie Bauer or Wenzel although I will certainly try.  In the meantime, i want to issue a caution to anyone else who may consider the 10x10 family dome tent from Eddie Bauer/Wenzel.

p.s. - Lest you think my opinion is biased somehow, I found several additional reviews that I WISH I would have discovered before buying this tent.
  "I was concerned when I saw large cloth zippers around the windows."  ...  " This tent leaks like a sieve !!!"

http://www.hiking-gear-and-equipment-used-for-camping.com/wenzel-tent.html
  "Be aware though that you still might get wet because at least some of the Wenzel
   tents are designed in such a way that water will fall off the rainfly and stream
   down the tent wall where it may leak through the zipper."

http://www.hiking-gear-and-equipment-used-for-camping.com/eddie-bauer-tent.html
  "I've heard of everything from snapped poles, to leaks, to tears, to more leaks
   (even after the seams were sealed), to zipper problems, and even zipper leaks."


10/11/2011: UPDATE - So I called their support department and the person I spoke said that the company would not honor the warranty because I purchased the tent off eBay (even though it was claimed to be new).  Her only solution was to offer me a discount if I wanted to buy a new Wenzel tent.  I cordially but firmly declined explaining that I would not give any more money to Wenzel if I had a choice in the matter.


Saturday, July 9, 2011

ENO Doublenest/singlenest

I'll post a more complete review of hammocks in the weeks to come, but here is a small teaser... I went to webelo camp last month and wanted a hammock to kick back and relax.  Now I want to first say I'm not a huge fan of hammocks.  My ideal of lounging on a campout is my foldable papasan from Bass Pro Shops.  That's a product desrving of its own review, but for today I'll stay on the hammocks. 

Anyway, I wanted something easier to pack and more lightweight than the bulky chair that has been so comfortable.  I figured a hammock was a viable solution so i started doing some searching and discovered the Eagle Nest Outfitters (ENO) series of hammocks and their favorable reviews.  I went to REI in search of the ENO Doublenest.  Without paying attention to the tags, i actually picked up the ENO singlenest first.  I realized my mistake when I got home and started to set it up.  Since I had it and REI was a 30 mile drive to return it, I decided to try it.  I quickly discovered why other reviewers had advocated the doublenest over the singlenest.  At 6'1", 260 lbs, the singlenest was just really tight.

I packed up the singlenest and headed back to REI to get the doublenest like I had originally planned... and my pursuit was not unrewarded.  I was significantly impressed with the space and build quality of the ENO doublenest.  I discovered that if you stretch the hammock tight between two trees, it wraps around you like a cocoon making it singnificantly difficuly to fall out of.  In fact, their is so much room in the hammock, I found I could double the fabric when tightly stretched between two trees and lie on it as a single hammock although it was much less stable using in in this unintended fashion. 

I was sufficiently pleased with my initial test that I decided to keep the hammock and take it to webelo camp and test it as I had planned.  When I arrived at camp, I quickly found two trees and setup the hammock.  Unfortunately, I discovered that the parachute fabric is so tightly woven it let little air through and the hammock was uncomfortably hot (it was 96 degrees outside anyway), but getting inside the hammock just trapped heat and stopped any breeze that happened to be blowing.  This significantly reduced my planned usage of the hammock unless I doubled it over and previously described and balanced myself on half the fabric- an awkward act at best.  At this point, I was beginning to doubt the hammock and planned to return it when I got back from the trip- but then came the 'storm'

During that night, a STRONG wind storm came through that night about 2:00 AM... no rain but wind gusts of 25~35 MPH.  I was in one of the old army tents provided by the camp and my tent kept swaying singnificantly- so much so I was concerned in would come down in the wind.  I decided as the leader of the boys, I didn't need to be bonked on the head if a tent came down- particularly mine, so I evacuated the tent and headed to my 'windproof' hammock.  I crawled up and let the hammock wrap itself around me and went quickly and confidently to sleep- oh how I slept!  In the tent, I had an army cot with a Thermarest Basecamp XL self inflating mattress.  This is arguably a comfortable sleeping arrangement but the hammock crushed it!  I like to sleep on my side and found the doublenest hammock large enough I could sleep on my side and still be comfortable. 

I slept *so good* in the doublenest hammock that I've started to reconsider how I want to camp in the future.  I am giving serious consideration to abandoning the tent when I am not family camping in favor of hammock camping.  The doublenest has some definate issues with heat entrapment (e.g. - Don't use this thing for summer camping in June-August in Texas) but this could work in my favor as the temperatures are cooler.  A second negative is cost- the entire setup (straps, rainfly, bug net, hammock) will cost nearly $200- pretty expensive for a one man sleeping arrangement.  I suppose it is inline with the cost for a small 1~2 man tent and the thermarest mattress- but like I said much more comfortable.  I remained a little concerned at the absence of privacy in a hammock or the idea of changing clothes in a hammock so time will have to tell if I continue down this path.

I'm also investigating other recommended hammock sleeping solutions and am giving considerable consideration to the hennessy deluxe explorer hammock.  I was introduced to the Hennessy by a guy in Ft Worth at rock climbing class but I didn't give it a second thought at the time.  Looking back, I think I can see why he advocated it.  Alternately, I may go ahead and just bite the bullet and buy the remaining bug net and tarp to go with the ENO.  In fact, Hennessy sells their tarp which is the same size as the ENO for $20 less ($59 vs $79).  It's made out of polyester instead of nylon but that isn't a problem to me- in fact most rainflys are made of polyester as I understand.

I will be the first to admit there are times that hammock camping doesn't make sense (desert, beach, anywhere trees are scarce), but for those destinations that have plentiful trees, I am going to give significant thought to this hammock idea.

p.s. - I have setup the hammock at my house a few times since camp and since discovered that loosely hanging it between two trees gives more room to the sides of the hammock and is more comfortable for simply lounging.  It doesn't try to wrap around as much and so it doesn't have the uncomfortable heat issues I first experienced.

Friday, July 1, 2011

Admit your mistakes. Share so others learn.

So this week we just returned from Robber's Cave State Park in Oklahoma. We were there Sunday through Wednesday to do some hiking, climbing and rappelling. Unfortunately, much of our activities were displaced due to a poor setup on my part. You see, I implemented a poorly designed rigging for a rappel and my wife fell. More details will be revealed as the blog continues.

We were on a short cliff (only 15') so i could introduce Lori to the basics of rappelling before we went to the larger cliffs up by the cave.  I rigged a fireman's belay with redundant nylon webbing to a single 'bomb-proof' anchor.  As my story will reveal, it proved to be a near fatal rigging.


So to hook-up, I had two straps individually wrapped around a large healthy oak tree.  This thing was massive- it must have had an 8 foot circumference at least because I couldn't wrap both my arms around it.  Anyway, I wrapped double in case a strap or knot failed- not likely but I wanted to be careful and make everything redundant.  Unfortunately, the unforeseen happened- and it almost ended tragically.
  I'm sharing my negative experience here so others may learn.


So Lori had her feet too close together and started to twist to the right.  Doing so caused the rope to slip into the crevice.   Even though I pulled on the double rope locking her in immediately, she continued to fall- not because she was slipping on the rope, but because the rope itself was falling into the crevice.  The horizontal slide of the rope and vertical drop combined for a 4' vertical fall and 8' horizontal swing into the granite wall on her right.  

[ASIDE: Making matters even worse- she wasn't wearing a helmet.  I had waived off the safety of a helmet thinking this cliff was so elementary and no loose rocks were to be found, we didn't need it.  How terribly wrong I was!  We always wear our helmets now no matter how rudimentary the cliff!]

She hit the wall HARD with her back, elbow and back of her head.  It knocked the wind out of her and even caused her to momentarily black out.  Her elbow was severely scraped and bruised and her back is black in several places.  She also received a significant knot on her head.  Fortunately, the window of time indicating a concussion has passed and x-rays showed nothing broken so we consider ourselves fortunate and blessed by God's mercy!


So my conclusion is I should have rigged my webbing to different anchor points.  Even though my second anchor point was smaller and further away, it would have provided the necessary connection point that would have stopped the rope from falling into the crevice when Lori slipped.

Conclusion: when connecting your rigging, consider the strength of your anchors but also consider how the choosing of your anchor points will allow your rope to swing/move.