Sunday, October 9, 2011

Eddie Bauer 10x10 Dome Garbage- ahem- I mean tent

So I was unhappy with the Coleman Family tent because it leaked during rains.  The primary failure is an inadequate rain fly and poor engineering of the tent, but I'll do a full review of that tent another day.  Today's review is about the 10x10 Eddie Bauer 5 man Dome Tent (Model EB30004 made by Wenzel).

My goal was pretty simple, to find a tent large enough I could setup 2 army-style cots and still have room for 2 kids and our gear.  Oh- and I wanted two doors and one that was waterproof- the primary reason I didn't like the Coleman tent.

I found the 10x10 Eddie Bauer tent on eBay for $75 plus $35/S/H so I knew I was getting a cheap tent.  Although the size was on the small side of what I needed for a family tent, I was drawn to what appeared to be the good rain fly coverage (See this pic)

and screen sides (desirable for camping in Texas).

So I was optimistic and eager to review the tent.  Well, it arrived yesterday and there was a chance of rain so I hurried to set it up in advance of the storms because I wanted to see if the rainfly coverage would keep the tent dry like I expected.  My results led me to provide some of my own picture of the product:


So why would I be so judgmental about a product I just received and haven't even used for one night?  It all amounts to the same problem but I'll try to express it in several ways:
  • Poor engineering
  • Lack of field testing
  • Absence of common sense
  • Inattention to detail
  • Ultimately, a tent design that GUARANTEES the tent will leak.
At the risk of revealing the obvious prematurely, a picture will help me clearly explain the problem:


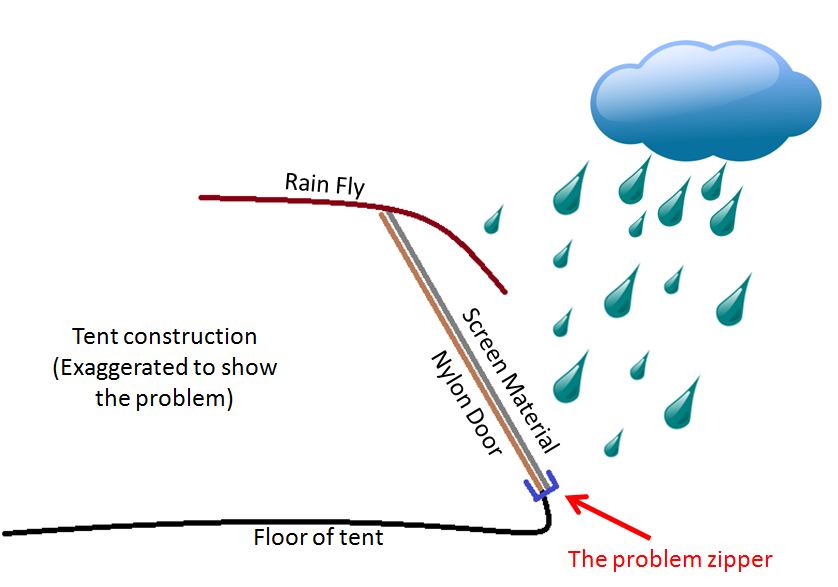
So here is what happens, during a rain, even the slightest wind will blow the rain on the portion of the door that is NOT under the rain fly.  The rain today wasn't even heavy- somewhere between a drizzle and a sprinkle. 
1) Anyway, the rain fell on the screen mesh which provided virtually zero stoppage (it's not supposed to, it's screen!)  and stopped at the nylon tent material of the door. 
2) At this point, it ran down exterior of the door until it hit the cloth zippers that hold the exterior screen door and the nylon tent door (yes, there are two seperate zippers). 
3) Water that drains down, accumulates between the exterior screen door and the interior nylon door- right where the cloth zipper lies.
4) At this point, there is nowhere for the water to go.  It just waits until it saturates the cloth zipper material (which doesn't take long) and starts to drip into the interior of the tent.
5) Even if the zipper material were entirely waterproofed, I suspect water would still find its way around the teeth of the zipper.

So my conclusion, with the current design of this tent, it is IMPOSSIBLE for the tent to remain dry in even the slightest of rain.  Although I purchased the tent new off eBay, I don't suspect I am going to get any solution from Eddie Bauer or Wenzel although I will certainly try.  In the meantime, i want to issue a caution to anyone else who may consider the 10x10 family dome tent from Eddie Bauer/Wenzel.

p.s. - Lest you think my opinion is biased somehow, I found several additional reviews that I WISH I would have discovered before buying this tent.
  "I was concerned when I saw large cloth zippers around the windows."  ...  " This tent leaks like a sieve !!!"

http://www.hiking-gear-and-equipment-used-for-camping.com/wenzel-tent.html
  "Be aware though that you still might get wet because at least some of the Wenzel
   tents are designed in such a way that water will fall off the rainfly and stream
   down the tent wall where it may leak through the zipper."

http://www.hiking-gear-and-equipment-used-for-camping.com/eddie-bauer-tent.html
  "I've heard of everything from snapped poles, to leaks, to tears, to more leaks
   (even after the seams were sealed), to zipper problems, and even zipper leaks."


10/11/2011: UPDATE - So I called their support department and the person I spoke said that the company would not honor the warranty because I purchased the tent off eBay (even though it was claimed to be new).  Her only solution was to offer me a discount if I wanted to buy a new Wenzel tent.  I cordially but firmly declined explaining that I would not give any more money to Wenzel if I had a choice in the matter.


Saturday, July 9, 2011

ENO Doublenest/singlenest

I'll post a more complete review of hammocks in the weeks to come, but here is a small teaser... I went to webelo camp last month and wanted a hammock to kick back and relax.  Now I want to first say I'm not a huge fan of hammocks.  My ideal of lounging on a campout is my foldable papasan from Bass Pro Shops.  That's a product desrving of its own review, but for today I'll stay on the hammocks. 

Anyway, I wanted something easier to pack and more lightweight than the bulky chair that has been so comfortable.  I figured a hammock was a viable solution so i started doing some searching and discovered the Eagle Nest Outfitters (ENO) series of hammocks and their favorable reviews.  I went to REI in search of the ENO Doublenest.  Without paying attention to the tags, i actually picked up the ENO singlenest first.  I realized my mistake when I got home and started to set it up.  Since I had it and REI was a 30 mile drive to return it, I decided to try it.  I quickly discovered why other reviewers had advocated the doublenest over the singlenest.  At 6'1", 260 lbs, the singlenest was just really tight.

I packed up the singlenest and headed back to REI to get the doublenest like I had originally planned... and my pursuit was not unrewarded.  I was significantly impressed with the space and build quality of the ENO doublenest.  I discovered that if you stretch the hammock tight between two trees, it wraps around you like a cocoon making it singnificantly difficuly to fall out of.  In fact, their is so much room in the hammock, I found I could double the fabric when tightly stretched between two trees and lie on it as a single hammock although it was much less stable using in in this unintended fashion. 

I was sufficiently pleased with my initial test that I decided to keep the hammock and take it to webelo camp and test it as I had planned.  When I arrived at camp, I quickly found two trees and setup the hammock.  Unfortunately, I discovered that the parachute fabric is so tightly woven it let little air through and the hammock was uncomfortably hot (it was 96 degrees outside anyway), but getting inside the hammock just trapped heat and stopped any breeze that happened to be blowing.  This significantly reduced my planned usage of the hammock unless I doubled it over and previously described and balanced myself on half the fabric- an awkward act at best.  At this point, I was beginning to doubt the hammock and planned to return it when I got back from the trip- but then came the 'storm'

During that night, a STRONG wind storm came through that night about 2:00 AM... no rain but wind gusts of 25~35 MPH.  I was in one of the old army tents provided by the camp and my tent kept swaying singnificantly- so much so I was concerned in would come down in the wind.  I decided as the leader of the boys, I didn't need to be bonked on the head if a tent came down- particularly mine, so I evacuated the tent and headed to my 'windproof' hammock.  I crawled up and let the hammock wrap itself around me and went quickly and confidently to sleep- oh how I slept!  In the tent, I had an army cot with a Thermarest Basecamp XL self inflating mattress.  This is arguably a comfortable sleeping arrangement but the hammock crushed it!  I like to sleep on my side and found the doublenest hammock large enough I could sleep on my side and still be comfortable. 

I slept *so good* in the doublenest hammock that I've started to reconsider how I want to camp in the future.  I am giving serious consideration to abandoning the tent when I am not family camping in favor of hammock camping.  The doublenest has some definate issues with heat entrapment (e.g. - Don't use this thing for summer camping in June-August in Texas) but this could work in my favor as the temperatures are cooler.  A second negative is cost- the entire setup (straps, rainfly, bug net, hammock) will cost nearly $200- pretty expensive for a one man sleeping arrangement.  I suppose it is inline with the cost for a small 1~2 man tent and the thermarest mattress- but like I said much more comfortable.  I remained a little concerned at the absence of privacy in a hammock or the idea of changing clothes in a hammock so time will have to tell if I continue down this path.

I'm also investigating other recommended hammock sleeping solutions and am giving considerable consideration to the hennessy deluxe explorer hammock.  I was introduced to the Hennessy by a guy in Ft Worth at rock climbing class but I didn't give it a second thought at the time.  Looking back, I think I can see why he advocated it.  Alternately, I may go ahead and just bite the bullet and buy the remaining bug net and tarp to go with the ENO.  In fact, Hennessy sells their tarp which is the same size as the ENO for $20 less ($59 vs $79).  It's made out of polyester instead of nylon but that isn't a problem to me- in fact most rainflys are made of polyester as I understand.

I will be the first to admit there are times that hammock camping doesn't make sense (desert, beach, anywhere trees are scarce), but for those destinations that have plentiful trees, I am going to give significant thought to this hammock idea.

p.s. - I have setup the hammock at my house a few times since camp and since discovered that loosely hanging it between two trees gives more room to the sides of the hammock and is more comfortable for simply lounging.  It doesn't try to wrap around as much and so it doesn't have the uncomfortable heat issues I first experienced.

Friday, July 1, 2011

Admit your mistakes. Share so others learn.

So this week we just returned from Robber's Cave State Park in Oklahoma. We were there Sunday through Wednesday to do some hiking, climbing and rappelling. Unfortunately, much of our activities were displaced due to a poor setup on my part. You see, I implemented a poorly designed rigging for a rappel and my wife fell. More details will be revealed as the blog continues.

We were on a short cliff (only 15') so i could introduce Lori to the basics of rappelling before we went to the larger cliffs up by the cave.  I rigged a fireman's belay with redundant nylon webbing to a single 'bomb-proof' anchor.  As my story will reveal, it proved to be a near fatal rigging.


So to hook-up, I had two straps individually wrapped around a large healthy oak tree.  This thing was massive- it must have had an 8 foot circumference at least because I couldn't wrap both my arms around it.  Anyway, I wrapped double in case a strap or knot failed- not likely but I wanted to be careful and make everything redundant.  Unfortunately, the unforeseen happened- and it almost ended tragically.
  I'm sharing my negative experience here so others may learn.


So Lori had her feet too close together and started to twist to the right.  Doing so caused the rope to slip into the crevice.   Even though I pulled on the double rope locking her in immediately, she continued to fall- not because she was slipping on the rope, but because the rope itself was falling into the crevice.  The horizontal slide of the rope and vertical drop combined for a 4' vertical fall and 8' horizontal swing into the granite wall on her right.  

[ASIDE: Making matters even worse- she wasn't wearing a helmet.  I had waived off the safety of a helmet thinking this cliff was so elementary and no loose rocks were to be found, we didn't need it.  How terribly wrong I was!  We always wear our helmets now no matter how rudimentary the cliff!]

She hit the wall HARD with her back, elbow and back of her head.  It knocked the wind out of her and even caused her to momentarily black out.  Her elbow was severely scraped and bruised and her back is black in several places.  She also received a significant knot on her head.  Fortunately, the window of time indicating a concussion has passed and x-rays showed nothing broken so we consider ourselves fortunate and blessed by God's mercy!


So my conclusion is I should have rigged my webbing to different anchor points.  Even though my second anchor point was smaller and further away, it would have provided the necessary connection point that would have stopped the rope from falling into the crevice when Lori slipped.

Conclusion: when connecting your rigging, consider the strength of your anchors but also consider how the choosing of your anchor points will allow your rope to swing/move.

Monday, May 16, 2011

Flashlight snobbery?

I've recently come to appreciate the advances in flashlights recently so I decided to try and find a balance between cost, light output and weight.  Rather than give a lengthy and wordy review that would still leave you confused, I decided the best way to show a review of flashlights is to show the results.  My goal was to find a lightweight flashlight that puts out a LOT of light and takes readily available batteries (AA or AAA).

The flashlights I compared for my casual test are shown below (from left to right and also heaviest to lightest):

FlashlightBatteriesWeightCost
Brinyte 750 Lumen CREE flashlight3 x AA10.677 oz       $55 on eBay
Coleman Max 144 Lumen Flashlight3 x AAA5.108 oz$20 at Wal-Mart        
SAIK CREE 300 Lumen flashlight2 x AA4.720 oz$12 on eBay
The traditional Brinkman mini-maglite        2 x AA3.781 oz$10 at Wal-Mart
Cheap 9 LED flashlight3 x AAA     2.441 oz$2 anywhere


So how did they perform?  All the pictures below were taken from about 40~50 ft back.  I had the camera mounted on a tripod and fixed on a 10 second timer.  I pushed the button to shoot and then tried to focus my light on the target.  Here is what I saw:


The cheapo 9 LED light

The Brinkman mini-maglite

The 144 lumen Coleman Max

The 300 Lumen SAIK CREE flashlight (I suspect the lumen rating is exaggerated compared to the Coleman flashlight)

The 750 lumen Brinyte dive light

So I really like the light output of the Brinyte and I like the added bonus it is submersible to 75 meters- not something I was looking for.  However, I don't like the fact that turning on the Brinyte is as easy as twisting the top.  That works great for diving (the intended use of this light) but I can see where it would get turned on  by accident when placed in a pack.  When you also consider the cost, you can probably get the most bang for your buck from the SAIK light- especially if you don't need to produce daylight on demand.

p.s. - The specs on the Coleman Max per Coleman for flashlight model 2000006530 144 lumens using a Cree XP-E bulb.

Monday, May 2, 2011

Review of the Alps Mountaineering Vertex 4

So it was under a great deal of sadness, I decided my Eureka Timberline 4 tent needed to be replaced.  I've spent a lot of nights in the Eureka but the the need to patch the floor was growing in frequency and the cosmetics of numerous patches was starting to bother me.  Since there have been lot of years pass since I purchased my tent, I decided to look and see if I could find a tent that I would love more than the Eureka.  Some of my criteria for a replacement tent included:
  • 4 person tent (so I could sleep 2~3 comfortably)
  • Weight < 10 lbs
  • Wanted a tent that will withstand a hurricane (not literally but STRONG wind + rain)
  • Aluminum poles (Not fiberglass)
  • 2 doors
  • Did not want a tent that used sleeves for the poles (strongly prefer clips)
  • Easy enough I could setup in the dark and in adverse weather conditions
  • Price < $200
After a lot of consideration, research, reading reviews and other feedback, I finally settled on the Alps Mountaineering Vertex 4.  Here are some of my initial thoughts and observations in no particular order:
  • There are 2 stuff sacks.  If I use the smaller sack for the fly, there is no sack for the poles.  Additionally, the sack for the fly is a REALLY snug fit.  This leaves me to put the fly and tent in the same bag and the poles in the second bag.  This works, but is still a pretty tight fit.  I would prefer a little more room in the stuff sack like the Eureka had.
  • The poles on this tent are incredible.  They look good and they appear really strong.  I didn't understand the concept of 'single-pole system' until I purchased and saw this.  It basically means all the poles and connectors are connected with bungee so you can't lose pieces like you can with the Eureka.  (It also means that a bent pole will require quite a bit more work if I ever have to replace it.)  The connectors to receive the poles are also a high quality aluminum (rather than the plastic used by Eureka.  See the picture.
  • The clips that attach to the top bar are easy enough for me to reach, but I am also 6'1".  It would be a long stretch for a shorter person to attach the middle clip on the top.
  • The tent goes up very fast (<5 minutes) even in strong winds.
  • The fly on this tent comes very near the ground and does an excellent job covering the tent itself.  I have near zero concern about staying dry despite adverse weather.
  • Even at 15 sq ft/side, the vestibule is small.  I wish it were large enough i could get into the vestibule and close it up before getting into the tent.  I'm a bit too big to do this so I must unzip the vestibule, then unzip the tent, get into the tent, zip the vestibule and then zip the tent- a bit more of an ordeal that I would like, but I'll accept.
  • First time I've had a tent with a vestibule and this one has two.  It's limited space but large enough for my 90L pack and muddy shoes.  I suspect I'm going to eventually love the vestibule.
  • They put windows in the fly.  I'm not crazy about this concept because it seems like a future leakpoint plus I favor privacy.  the windows can't really be closed off either.  However, the angle of the windows makes it difficult to impossible for someone to see in unless they are intentionally trying to peer in and I can see advantages to being able to see outside to see the weather.  I'll refrain from judgment on this one.
  • Not as many screen windows on this tent as I would like for a tent that is going to primarily be used in Texas.  I'll try it and see but I suspect I might find this will indeed be a 3 season tent, but summer won't be one of them.
  • The tent is largely free standing (e.g. no guy lines required).  It does have anchor spots for them if you decide to use them, but the tent is so stable without them, I can't imagine a case I'll need to connect them- although time will tell.  With that said, the sides of the fly do have a spot to stake the fly- however, I discovered that I really need to attach a short ~18" guy line to keep the fly off the wall of the tent.  A little disappointing, but easily manageable.
  • I'll be taking the tent out on an actual trip in ~2 more weeks and will provide an updated review after that.

Here is the tent itself without the fly:


Here is the tent with the vestibule open:

    The tent all secured and zipped up.  (Notice I did not stake out the sidewalls in this shot)
    This is the quality of the poles and connector I was talking about: